You probably won't know how to put on eye lenses if you've never worn them. It's not as easy as it seems: it costs nothing to wrinkle them, put them on the wrong way or tear them. However, by repeating the same procedure every day, it is easy to learn how to put on contact lenses and always do it quickly and easily.
There is no need to be afraid: if you follow the basic rules, you will not get an infection in your eyes, spoil the lens, or experience any discomfort. The best way to learn how to quickly and easily put on contact lenses is through a video, but for those doing it for the first time, we recommend reading the basic rules.
Preparatory stage for using lenses
Before putting on contact lenses, you should wash your hands well. It is advisable to use unperfumed, antibacterial soap and dry your hands with a lint-free towel. Afterwards, rinse thoroughly. Dirt and SCL are incompatible!
If there is no soap or it is simply impossible to use it, disinfection with antiseptic wipes or solution is allowed. You should start putting on contact lenses after your hands are dry.
Important! Don't be afraid to use contacts; millions of people wear them, put them on and take them off. But for the first time it may take even 5-10 minutes. It's okay, you're still a beginner. It will be useful to watch the training video. For example, from the ADRIA contact lens brand. Moreover, it is better to save it so that you can review it again if necessary.
Checking lenses before wearing
Whether you are wearing contact lenses for the first time or have already done so, they need to be checked. First, carefully consider whether their position is correct. Remember that only one side is intended for fixation in order to correctly carry out vision correction.
You should check that the position is correct, otherwise the SCL will not improve vision, but, on the contrary, will cause eye discomfort.
It is not difficult to recognize the inverted position. The lens looks like a plate with the edges pointing to the side. It's like she's open. In its normal position it resembles a cup.
To check the lens, you should place it on your finger; in this position, it will not be difficult to examine the shape. If the product is inside out, then it will need to be given the required position and rinsed in a special solution to keep the lens clean. It is prohibited to use running water for rinsing.
For the first time and all subsequent times, check:
- integrity - cracks, breaks and other defects are unacceptable;
- cleanliness;
- moisture.
If the lenses are in order, then you can move on to the next step.
Rules for handling SCL
There is a whole set of rules for handling SCLs; they should be studied before you start using them. They can only be stored in special liquids. If for some reason this is not possible, saline solution, but not water, can be a temporary replacement.
The rule for girls is to put on SCL before applying makeup, and take it off before removing it. To avoid damaging your contact lenses, you should use non-fibrous decorative cosmetics and non-greasy products.
Other recommendations:
- put on no earlier than 30 minutes after using eye drops;
- when placing back into the container, place it strictly in the center and carefully close the lid;
- Avoid contact with hand cream or other substance;
- do not go to bed with an SCL unless this wearing regimen has been discussed with an ophthalmologist;
- one blister is used to store one product;
- Avoid contact with aerosols. If you need to use nail polish, deodorant, even air freshener, close your eyes for half a minute until the aerosol settles;
- If discomfort occurs: redness, irritation, increased tearing, sensitivity to light, immediately remove the SCL. Do not tolerate it under any circumstances!
Over time, these vision correctors wear out, so they should be replaced regularly. Do not use after the expiration date if there are scratches or deposits that cannot be washed off with a special liquid. Another important note - do not shower with contact lenses to maintain eye health and use lenses in accordance with the recommended replacement period.
How to put on lenses for the first time: simple steps
All you need to try on lenses yourself is a mirror, a special care solution, and a pair of lenses with a container. It is better to adapt to wearing lenses opposite a window or in a room with good lighting. Mentally repeat the ophthalmologist’s instructions on how to properly put on contact lenses and get started.
Step 1: Wash your hands
Good hygiene routine takes on added importance when it comes to contact lenses. The fact is that with such close contact, bacteria from the skin can easily settle on the material from which the lens is made, and from it they will get directly into the eye, which can lead to inflammation. To avoid this, use unscented soap and thoroughly rinse off the dirt with running water. Then dry your hands with a towel or lint-free wipes. Getting lint between the lens and the eyeball can also lead to unpleasant consequences: pain, lacrimation, injury to the cornea or its infection, damage to the lens.
Do not lubricate your hands with cream: the composition will remain on the lens, and irritation is guaranteed.
As a last resort, use a disinfectant solution.
Step 2: Take out the lens
For now - one. If the packaging is new, open the blister with the desired lens; if you are using it again, remove it from the container compartment. Determine and remember which eye is more convenient for you to start with: this way you will not confuse externally identical lenses with different diopters.
Both in the blister and in the container, the lens floats in a special solution that disinfects, cleans and protects it from drying out. Gently remove the lens with the tip of your index finger.
Step 3: Examine the Lens
The surface of the lens should be smooth, damp, without tears, scratches or foreign particles. If you notice lint, rinse the lens with the solution. Scratches and tears indicate that the lens needs to be replaced.
Pay attention to the shape of the lens. If it is turned out the way you want, its edges will face up, like a bowl. If the lens is placed inside out, it will be shaped like a plate - with the edges curved outward. You can also carefully connect the edges of the lens. If they close like a shell, everything is fine; if they bend in different directions, the lens must be turned out. In this case, pour a little solution into your palm, place the lens in it and carefully turn it to the desired side.
Step 4: Put on the lens
With a slight movement, pull down the eyelid - lower eyelid, look up or to the side. Then gently press the lens onto your eyeball. It is important that there are no air bubbles left between the lens and the cornea. Close your eyes and make a few rotational movements. Open your eyes and look in different directions. The lens is in place. Blink your eyes carefully. Comfortable? So everything worked out!
Putting on lenses for the first time is not difficult, but it is better to practice. A couple of days before the first fitting, several times a day, with clean hands, pull down the eyelid and lightly touch the eyeball. This will allow you to get used to the touches so as not to blink at a crucial moment.
Step 5: Clean the container
Once the lenses are in, it's time to take care of the case. Discard the old solution, rinse the container with fresh solution, and place it upside down on a clean paper towel to dry.
Do not wash the container with water, even soap! As a result, it can cause various bacterial infections, such as Acanthamoeba keratitis, an eye infection that can lead to blindness. Lenses should only be washed with a special solution, such as ReNu® MPS.
How to put on lenses correctly: step-by-step instructions
Immediate advice for those who are just learning how to put on contact lenses correctly is to always start with the right or the left. This is very important if you wear correctors with different diopters.
Step-by-step instruction:
- Place the blisters to the right and left of you , respectively, for the eyes that will be worn.
- Carefully remove MK L. To do this, lightly press with your index finger and lift along the wall of the container. Do not grab with a fingernail, fish with your fingers, pick up with tweezers or other auxiliary means. There is a high risk of scratching the delicate surface.
- the eye lens on your index finger .
- Examine the SCL and evaluate it according to the criteria described above. Rinse if necessary.
- Using the middle finger of the hand on which the product is located, pull the lower eyelid down .
- Using the middle or index finger of your free hand, lift your upper eyelid o.
- Place it on your eye and blink.
- the same with the second eye.
There may be a feeling that the product is in the way for a few seconds, but this will quickly pass.
In most cases, if you follow the steps above, the corrector will be exactly centered and in the desired position. But it happens that the hand trembles and it is not possible to place the SCL as needed. Or they rubbed the eye and it moved. You should know how to perform alignment. It is not painful and does not cause any discomfort.
You should close your eye and gently move your finger. Do not press, a barely perceptible massaging movement is enough. Or you can do this without closing it - pushing it through the lower or upper eyelid. Depending on where exactly it has moved.
How to remove lenses
The procedure for removing lenses from your eyes:
- Wash and dry your hands thoroughly.
- Rinse the compartment with a clean and dry container.
- Pour fresh solution into it.
- Gently pull back the lower eyelid, use the tip of your index finger to move the lens down from the center and grab it with a pinching motion of your index finger and thumb.
- Feel free to throw away your one-day lens. Place the scheduled replacement lens into the desired compartment of the container. Make sure it is completely covered with the solution.
- Close the container tightly and repeat the procedure with the other eye.
At the end of the day spent wearing lenses, your eyes may need additional hydration. If you feel dry, use artificial tears and consult an ophthalmologist as soon as possible for advice.
It is correct to remove lenses from your eyes for the first time over any surface, such as a table. If the lens slips out, you will have no problem finding it.
The correct algorithm for removing contact lenses
It’s not enough to learn how to put on contact lenses; you also need to remove them correctly. The preparation is similar to that indicated at the very beginning. Hands must be clean. Stick to the order - start only with the right or with the left, do not change it.
Instructions:
- Check centering.
- Look up.
- With the index finger of your right or left hand (depending on which eye you are shooting from), touch the edge, press lightly and move down or to the bridge of your nose.
- The tight seal is lost so it can be easily squeezed with your index finger and thumb and removed from the eye.
After removing the SCLs, prepare them for storage. To do this, place it on your palm in the center and drop a special solution. Then rub it easily. This is required to remove protein plaque. Rinse the containers and micro contact lenses additionally. Pour a fresh portion of the solution and send the removed product there.
The algorithm is gradually automated, and if you learn to do everything correctly, you won’t even think about the order of actions.
Solving the problem with reflexes when using lenses the first time
The normal reaction is to close the eyes when something approaches the cornea. This reflex protects against the entry of debris, dust, and any foreign objects. To prevent this from interfering with putting on lenses, you should hold your eyelid correctly. Namely, fix them with the index and middle fingers of your free hand. At first, while you spend more time putting it on, this can cause some discomfort. As the process is automated, the discomfort will go away.
What will change when changing from glasses to contact vision correction?
The first mentions of contact vision correction appeared long before the invention of glasses.
Leonardo Da Vinci also proposed lenses that are worn directly on the eyes. These were quite hard glass discs and were therefore considered uncomfortable. However, many of the great master’s inventions were far ahead of their time. Changing from spectacle vision correction to contact vision correction saves a person from many inconveniences and hassles. Contact lenses do not need frequent wiping; they do not need to be removed when entering a warm room, because the lenses do not fog up or become covered with frost. In addition, with the help of colored lenses you can change your eye color, and therefore your image.
When choosing contact vision correction, the following questions first arise.
Differences between manipulations with colored, scleral and astigmatic lenses
Colored ones are put on in the same way as regular SCLs, that is, you can use the algorithm presented above.
Scleral ones are larger, and to place them on the eye it is worth holding them with three fingers rather than one. They are first filled with sterile saline or a special liquid.
Astigmatic, also known as toric, have fixation features depending on their type.
Learning to quickly put on and remove contact lenses from your eyes is not a problem. Although at first it seems that this is impossible, gradually the whole process will proceed automatically, the user will not even have to think about the procedure.
Is it possible to sleep in lenses?
The ability to sleep in lenses depends on their characteristics: hydrophilicity and oxygen permeability. The mode of wearing lenses is indicated on the packaging. Ophthalmologists do not recommend exceeding the specified period of continuous wearing: this is fraught with irritation of the mucous membrane and other troubles.
You learned how to put on lenses for the first time, and how to remove lenses for a beginner. At first, these manipulations may seem complicated, but over time they will become a habit and will be completely familiar, the main thing is not to forget about the rules of hygiene and regular visits to the ophthalmologist.
Wondering how to put on lenses for the first time in your life?
Contact lenses should be worn above a table, not suspended or over a sink. If the lens falls, do so on a clean surface. After which, you can wash it in a solution, a spare bottle of which is best to have on hand. It is not recommended to wash contact lenses with regular running water. The lenses may darken or crack.
Of course, putting on lenses must be done with clean hands. It is important to start on one side and move to the other. From the right eye to the left or vice versa. It is not recommended to change lenses from left to right, because the microflora of human eyes is not the same.
MagazinLinz.ru team
Tags: Accessories Contact lenses Solutions Articles Colored lenses
How to put on and remove contact lenses
Before installing or removing, wash your hands and pat dry with a lint-free towel or paper napkin. Try not to touch the lenses with wet hands.
How to put on lenses
It is most convenient to do this in front of a mirror, standing or sitting. Good lighting is important. You need to tilt your head slightly forward and look into the distance so that the pupil is in the center. There is no need to look at the finger with the lens.
1. Insert lenses, always starting from the same eye. This way you won't confuse them. 2. Remove the lens from the solution using silicone-tipped tweezers or your fingers. 3. Rinse both sides. Try not to touch anything with the tip of the solution bottle. 4. Look for damage, tears, stuck lint or clouding. 5. Place the lens on your index finger and check its shape:
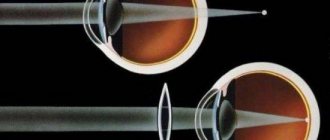
The shape should resemble a cup with the edges raised up.
If the shape resembles a plate with the edges pulled to the side, the lens is turned inside out. Carefully return to the correct position.
Some manufacturers mark one side to make it easier to determine the position. You can read about this in the instructions.
6. To avoid drying out, you can apply moisturizing drops that are compatible with your type of lenses before installation. 7. Using the fingers of your left hand, move the upper eyelid to open the eyeball as much as possible. You need to hold the skin tightly so that the eye does not close reflexively.
8. With the middle finger of your right hand, move the lower eyelid. Use your index finger to place the lens against the sclera.
Without releasing your eyelids, make several movements with your eyes from side to side.
9. Gently release the eyelids and lower the eyes down, so the lens will be finally positioned.
10. Follow the same steps for the second eye.
Installation problems
If you followed all the steps correctly, but after installation you see something blurry, this could be due to several reasons: • Incorrect positioning. The lens may have gotten under the eyelid or become dislodged. Adjust its position or take it off and put it on again. • Pollution. If the surface is stained with an unknown substance, replace the lens with a new one. But often the cause of pollution is protein discharge from the eyes. In this case, it is enough to remove the deposit with a solution. • Lenses are mixed up. Try swapping lenses. If after this the discomfort goes away, then the problem is solved. If the discomfort spreads to the other eye, replace the lens. If there are still problems with the same eye, remove the lenses and, if necessary, visit an ophthalmologist.
Problems when wearing
If excessive dryness occurs, use moisturizing drops. Not all formulations are suitable for use with contact lenses. Therefore, carefully read the instructions before use. You should immediately remove the lenses if while wearing: • You feel stinging, burning, itching, pain; • There was a feeling of a foreign body; • Objects became blurry, distorted, and halos appeared; • Heavy discharge has begun, the eyes and conjunctiva are irritated.
Also, you should not wear lenses during infectious diseases. If you were wearing lenses at the time of the onset of the disease, this pair needs to be replaced.
How to remove lenses
1. Prepare the container. To do this, you need to rinse it and fill it with fresh solution. 2. Start removal from the same eye as installation. 3. Make sure the lens is mobile - lift your eyelid up and try to move the film down with your index finger. If this does not work, apply moisturizing drops, wait 2-3 minutes and try again.
4. When the lens is at the bottom, carefully grab it with two fingers and remove it.
5. Rinse for 10-15 seconds with the solution, rubbing lightly with pads. 6. Place in container.
Repeat the procedure for the other eye.
How to put on and remove contact lenses with long nails.
What to do with long nails for those who use soft contact lenses and have to put them on and take them off every day.
Why are long nails so dangerous? First of all, damage to the conjunctiva and cornea of the eye, as well as the lens itself.
Buy tweezers with soft silicone tips. It will allow you to carefully remove the lens from the blister or container and place it on your fingertip. You can also remove lenses using tweezers. To make it easier to remove the lens from your eye, we recommend that you drop 1-2 drops of moisturizing drops into each eye before removing it.
Watch the video on how to properly put on and remove contact lenses.