What are night lenses
Night lens therapy is called orthokeratology or OK therapy.
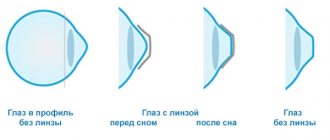
These rigid gas permeable lenses should be worn at night and removed upon waking. During sleep, the epithelial layer of the cornea undergoes restructuring, which provides a temporary improvement in vision. During the entire next day, you can walk without daily contact lenses or glasses.
Daily colored lenses with diopters, information here.
The use of orthokeratological lenses will help slow down the development of progressive myopia in junior and senior schoolchildren. The lower the degree of myopia, the longer the effect of OK therapy lasts.
Night lenses have an outer surface that does not differ from the surface of conventional contact lenses, and an inner surface that has a complex structure that provides a pressure effect on the ocular surface. As a result of pressure, the cornea becomes deformed.
If you experience discomfort while wearing lenses, you should consult a doctor.
The gas permeability of night lenses allows the eyes to breathe.
Advantages
- Safe to use.
- Maintain clear vision throughout the day.
- Normalization of the lacrimal glands.
- There is no negative effect on the cornea.
- Ensuring respiration of the surface of the eyes.
Flaws
- Therapy can last no more than 3 years.
- Regularly wear lenses at night.
- Possible development of complications (corneal edema, decentration, astigmatism).
- Stopping use reduces the effect to zero.
Night lenses are suitable
- People with myopia up to 6 diopters.
- Children with myopia from 7 years old.
- People with myopia who, according to doctor's orders, should not wear rimless glasses or undergo surgery.
- People for whom wearing daily contact lenses is difficult (dusty work, professional sports, etc.).
Lens care kit
OK therapy is contraindicated in
- Glaucoma or cataracts.
- Astigmatism.
- Destruction of the cornea.
- Inflammation of the eyes.
- Dry eye syndrome.
- Allergies to lens materials, composition of solutions.
- Keratoconus.
Surgical treatment of glaucoma is described here. Read also about macular degeneration of the retina in the article.
Night lenses are worn for a whole year or even a year and a half. At first, there may be a feeling of discomfort in the eyes, the appearance of a rainbow halo, or a glow from light sources. But after a week it all goes away.
As for the cost of night lenses, their average price is 15 thousand rubles. Due to the long wearing period, the cost of monthly therapy will be less than a thousand rubles.
How to choose hard night lenses
You can’t just take these lenses and buy them at the pharmacy (in theory, of course, you can, but you shouldn’t do that)—you first need to get the exact parameters for your eye.
The procedure goes like this: after standard diagnostics, the clinic selects lenses from a suitcase with approximately 160 lens options. You try them on for about half an hour to an hour until you feel that this particular one fits perfectly (that’s why I recommend first learning how to wear one-day ones, otherwise the diagnosis will be quite unpleasant - in our country, for example, children often cry when their eyes are touch). Once you find your ideal lens with your eye, the optometrist will apply a fluorescent solution to it, which will glow under the IR illumination of the microscope. By looking at the circle on the corneal epithelium, you will be able to understand how correctly your “ideal” actually sat. After double checking, you will either receive ready-made lenses (if the clinic specializes in calculating them), or they will be ordered for you in the USA and will arrive in a couple of weeks. In our practice, given the not very large number of options to sort through (most often you need 10–20 of the most typical models), you will go home straight away with new lenses. Sometimes patients from lens manufacturers are sent to us for diagnostics to get results from a Scheimpflug camera (Pentacama), because we need a combination of ease of placing the lenses on the eye and their accuracy of selection. You need both sets of equipment - expensive diagnostics and a suitcase with a bunch of accessories.
These lenses are expensive, cost about 28 thousand rubles per pair, plus wisely you need to do 4 examinations during the first month, then once every 3 months. In general, even with regular contact lenses you need to check regularly, but few people do this.
Every year you need to throw out the old ones and buy new ones, without wearing them out too much. They also need a regular storage solution (the first portion), containers and manipulators - in general, everything you need. This is also usually included in the price, as is diagnostics.
If night lenses are chosen for children with progressive myopia (in order to stabilize the process due to peripheral defocus), there is another feature. Until the age of 18, according to the law, a parent bears full responsibility for his child, so the procedure for choosing and learning to use is done strictly together with mom or dad, both at 15 years old and at 6 years old. Yes, you can use them starting from about 6 years old; before that it makes no sense - the child will most likely lose them.
Rules for using night lenses
Compliance with the rules for using lenses for night wear is the key to eye health. So, let's figure out how to put on soft lenses correctly:
- First, your hands must be clean. It is necessary to wash them with soap and dry them thoroughly with a towel. It is best to use paper towels - it is more hygienic.
- Secondly, when starting to put on lenses, you need to sit down and, looking in the mirror, begin to manipulate the lenses. Ophthalmologists advise putting on the right lens first. This will prevent you from getting confused.
Maintaining hygiene
The result of wearing night contact lenses
Night lenses are considered safer than day lenses. They are worn for only 6 or 8 hours, unlike other types of contact lenses, which can be worn for half a day or a whole day.
If you properly care for your lenses, as described above, and maintain hand hygiene, you won’t be afraid of catching an eye infection. If all tips and recommendations are followed, the risk is minimal and reduced to zero.
Installing and Centering Lenses
Stages of installation of orthokeratology lenses:
- Remove the lens from the container using plastic tweezers.
- Place it on the pad of your index finger.
- Carefully inspect the lens for cleanliness, damage, or correct side.
- Pull back the upper and lower eyelids. The upper one is with the index finger of the left hand, and the lower one is with the middle finger of the right hand.
- The gaze is directed straight. At this time, bring the lens to your eye and press it lightly.
- Carry out a similar procedure with the left eye.
- Rinse the container with clean water and dry.
If the lens is not inserted correctly, it may become dislodged. At the same time, very unpleasant sensations appear, tears begin to flow. Accordingly, it is simply impossible to see in such lenses.
To center the lens, you need to sit in front of the mirror and open your eyes wide. When the lens is found, you need to close your eye and turn it in the opposite direction from the displaced lens. Using your index and middle fingers, without pressing hard, move the lens to the center of the eye, which in turn should turn towards the moving lens. All manipulations must be performed with closed eyelids.
Under no circumstances should you remove or center lenses with your fingernails. This can damage both the lens and the eye.
To check how the lenses are put on, you need to close your eyes one by one and look somewhere into the distance.
Daytime (soft) contact lenses
Lens installation
1. Remove the lens from the bottle. 2. Rinse the lens with a solution (never tap water). 3. Inspect the lens to make sure it is wet, clean, clear, and free of chips and cracks. 4. Place a few drops of solution (wetting drops) onto the surface of the lens. 5. Place the lens on the tip of your index finger. (If you are right-handed, use your right hand, and vice versa). 6. Using the middle finger of the same hand, lower the lower eyelid. 7. Using the index or middle finger of your other hand, lift your upper eyelid. Place the lens on your eye. There is no need to press the lens to your eye. 8. Gently release your eyelids and blink. The lens centers automatically. 9. Use the same technique to install the second lens.
If your vision is blurry or you feel discomfort after wearing contact lenses:
- the lens may not be positioned in the center of the eye
- there may be debris on the lens, in which case it needs to be removed, cleaned, rinsed and disinfected, and put back on
- You may have mixed up the right and left lenses
To properly center the lens, do one of the following:
- close your eyelid and gently massage the lens through your closed eyelids
- Gently push the eccentric lens onto the cornea while the eye is open by pressing your finger on the upper or lower eyelid near the edge of the lens
Removing lenses
Blink method
1. Cover the table with a clean towel. Lean over the surface. 2. Place your index finger where the upper and lower eyelids meet, at the outer corner of the eye. Pull the skin outward and slightly upward, keeping your eyes wide open. 3. Blink quickly and sharply. The lens will be compressed by the pressure of your eyelids and will pop out onto a clean towel (or into your hand if you hold it up).
Two finger method
1. Cover the table with a clean towel. Bend over and look down. 2. Place the tip of the index finger of one hand on the middle of the edge of the upper eyelid, and the tip of the index finger of the other hand on the middle of the edge of the lower eyelid. 3. Press both eyelids inward. The lens should be pressed between your eyelids, it will come out of your eye and fall onto the towel or into your hand. 4. The lens may slide over the white part of the eye. In this case, center it first before attempting to remove it again.
Removing the Lens
After the night, ophthalmologists advise be sure to use drops when wearing lenses to moisturize the ocular surface. Lenses should not stick to the eye, they should be movable.
If necessary, you can add a few more drops, then blink and move the lens through your closed eye.
Once both lenses move freely, you need to remove them. For this:
- Pull back the upper and lower eyelids in the same way as when putting on lenses.
- Bring the special puller to the eye so that it is perpendicular.
- It is easy to press the puller against the lens and pull it away from you. This way you can easily remove the lens.
Read the material on how to choose lenses for your eyes.
Eye disease myopia.
Read this article about the dangers of conjunctivitis during pregnancy.Squint surgery in adults reviews: https://eyesdocs.ru/zabolevaniya/kosoglazie/kosoglazie-u-vzroslyx-prichiny-vozniknoveniya-lechenie-profilaktika.html
How to remove a lens stuck to your eye
It will take some time to learn how to quickly remove and put on contact lenses. During your consultation, the ophthalmologist will show you how to do this correctly. In our article you will find some tips on how to remove a stuck lens.
Difficulties in removing contact correction products arise not only for beginners who put them on for the first time. This is evidenced by numerous forums on social networks. Those who violate the wearing regime are faced with the problem of the lens sticking to the eye. This also affects people with sensitive eyes prone to dryness.
If you cannot remove the lens from your eye, contact your ophthalmologist. Probably, the cause of your difficulties was incorrectly selected corrective optics. The doctor will conduct an examination and remove it from the eye. At the appointment, you can ask questions and ask for advice on care and choosing contact correction products.
Try removing the lens yourself. To get started, follow two general recommendations:
- Wash your hands with soap and prepare the area for lens removal. Sit in front of a mirror at a well-lit table. You will need a container, a multifunctional solution and moisturizing drops. A special suction cup is useful for removing hard lenses.
- Do not try to pry the lens with your fingernail or other sharp objects. You may damage the delicate tissues of your eye.
Let's look at several options when you can't remove the lens.
Case 1: it is on the cornea and stuck. Most likely the lens has dried out. Place moisturizing drops, 2-3 in each eye, and wait 1-2 minutes. Using the fingers of your left hand, open (pull) the upper and lower eyelids of your right eye. Using the pads of the index finger and thumb of your right hand, lightly press on the edges of the lens and, with a pinch motion, pull it towards the center of the cornea. Remove and disinfect in solution, place in storage container. Next, do the same manipulations for the left eye.
Case 2: not visible on the cornea, felt in the eye, causing discomfort and tearing. Don't panic. The muscles of the eye will not allow the lens to “roll” behind the eyeball and, most likely, you will find it under the eyelid. Listen to your feelings to understand exactly where it is. If possible, blink, move your gaze from side to side, from top to bottom. Pull the eyelid under which the lens was found with the fingers of your left hand, and with a pinching movement of the fingers of your right hand, remove it from the eye. Do not put pressure on the hard contact optics to avoid damaging the eye tissue; use a special puller to remove it.
Case 3: not visible on the cornea and not felt in the eye.
Most likely, the lens has already fallen out or been washed away with water. This often happens when diving, swimming in a pool without safety glasses, and when you take a shower. Just in case, pay attention to the sensations in your eye for a while, and if you are unsure whether the lens is still there, consult an ophthalmologist.


