Sivtsev table for detecting astigmatism
This table is a set of letters of various sizes. It is used to check visual acuity. This is where testing for astigmatism and any other pathologies should begin. The table has two options.
Rice. 1
Rice. 2
The test is carried out according to the following algorithm:
- The table is hung on the wall in a well-lit room;
- The patient stands opposite her five meters away;
- Covering his left eye, he looks at the table with his right and reads the letters that he can see;
- Then the person closes his right eye and examines the signs with his left eye.
With 100% vision, all letters in the table are visible, including the very bottom lines. It is important to cover your eye without pressing it with your hand. Otherwise, when pressed, the image will be unclear, which will distort the test result.
As a cheat sheet, the distance in meters (D) is indicated on the table where each line begins. From it, a person with normal vision can easily recognize the letters in the indicated line.
This test can be carried out with the Golovin table. This option is suitable for testing the vision of children who cannot yet read.
Rice. 3
No less often, the Orlova table is used to check the visual acuity of children.
Rice. 4
Basic methods for diagnosing astigmatism by a specialist
Return to contents
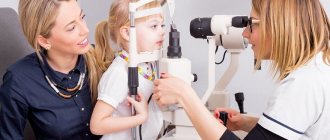
Visometry
At the ophthalmologist, the first thing you will do is take a classic test with a set of tables: Sivtsev (Cyrillic), Golovin (half rings with cuts), Snellen (Latin) and Orlova (images of objects for children). These posters are available in every eye doctor's office.
Test order:
- The patient sits in front of the table at a distance of 5 meters - this is the most optimal distance for focusing the rays on the retina.
- The test is carried out for each eye.
- The doctor points to a symbol or letter, you name it. The answer should take 6 seconds.
The doctor records the result for both eyes; it may vary. If the patient sees all 10 rows of the table, then vision = 1.0 (excellent), 9 = 0.9. The result may be greater than one, since there are 12 rows on the poster.
Final entry (example): OS=0.7 (left eye), OD=0.5 (right).
If points are selected, then the result is: OS= 0.7| -0.3 = 1.0, OD= 0.5| — 0.5 = 1.0. The minus sign means that a diverging lens is needed to correct vision.
Skiascopy
In other words, a shadow test. The test is carried out using a skiascope device in the form of a mirror with a handle, one side of it is flat, the other is concave, and in the center there is a hole for observation. This test is honest and allows you to find out whether the patient is “faking” and is suitable for examining children after 7 years of age. It cannot be performed in case of photophobia, glaucoma (can provoke an attack), or in a state of alcohol or drug intoxication.
Progress of the examination:
- Drops are placed into the patient's eyes to dilate the pupils.
- They place him on a chair not far from the doctor, with a lamp on the left.
- The doctor directs a light beam onto the retina, moves it, observes its shadow, and judges the degree of refraction.
- To accurately determine the stage of astigmatism, cylindroskiascopy is additionally performed.
Computer refractometer
It is carried out with a device that emits a beam of infrared rays onto the retina - a refractometer. They are reflected and returned to the camera. The results of the study are visible instantly.
Inspection progress:
- For three days, in the morning and evening, an atropine solution is instilled to ensure the accuracy of the result.
- The patient's head is fixed in a stationary position.
- The person looks at the picture; it is possible to blink during the procedure.
- During this, the beam is directed to the eye, the doctor takes measurements, and the results are displayed on the screen.
Duration - 1-2 minutes.
Contraindications: intoxication, cataracts, mental disorder, vitreous opacities.
Siemens star
This picture test for astigmatism is considered the most accurate and informative.
The Siemens star is a set of rays diverging in different directions. The rays are the same in color and size. You need to look at the image one at a time, covering first one eye, then the other.
A person with perfect vision sees in this picture:
- clear, slightly blurry lines;
- gray background gradually forming in the center;
- white circles in the middle of the picture;
- changing the size of the center of the circle as the distance between the image and the patient's eyes increases or decreases.
With astigmatism, the image of the Siemens star is distorted. Instead of an even circle, a person sees an oval or other figure.
Other tests with lines
There are 2 more simple tests. The essence is similar: you need to look at the picture with each eye in turn. If the lines are clear, even, black, with the same distance between each other, then this is the norm. And if there are changes, then you should consult a doctor for a more complete vision test for astigmatism.
Another option for testing at home is to take a sheet of paper and draw a lattice. The lines must be the same in thickness, length, and color saturation. Then take the sheet and start rotating it. A person without pathology does not see a difference when moving the grid in different planes. And a person with impaired visual functions will note that the lines change length, become distorted, sometimes turn pale, sometimes darken.
Divergent rays
This is another option for an at-home picture test for astigmatism. It allows you to determine the pathology with varying degrees of damage to each eye. Outwardly, this image also resembles diverging rays, although here they are much larger.
During the test, you need to close one eye with your hand and look at the image with your free pupil. Then the same must be repeated with the second eye.
Astigmatism is present in people who perceive the picture differently with each eye with the following difference:
- increase in the number of rays by two to three times;
- darkening or lightening of some rays;
- a clear outline of some lines combined with blurriness of others.
What is astigmatism
Our eyes see the world around us through a complex prism of a structure, including the lens and cornea. The lens has a regular curved spherical shape, thanks to which a person perceives the picture of the outside world correctly. If the curvature of the lens is disturbed, then the image appears blurred and unclear. When light rays are refracted, they reach different parts of the eye. This is astigmatism. By the way, the same condition occurs when the curvature of the cornea is disturbed.
By the way, almost every person has a small degree of astigmatism. Physiological astigmatism is said to exist if there is an impairment within 0.3 diopters.
How to make tables yourself
Today you can find tests for astigmatism using pictures on the Internet. Special programs are publicly available, thanks to which the check can be carried out directly on the computer.
However, the most accurate and informative testing is only possible when using a paper picture. The best option is large-sized tables downloaded from the Internet and printed using a printer.
By placing such pictures once in your room or office, you can check your vision at any convenient time. In addition, regular testing will help monitor the health of the visual organs when performing special exercises, for example, according to the Bates method.
Important!
To print tables yourself, you need to use a good laser printer. It is advisable to refill the cartridge so that the image is as clear as possible, without light areas or streaks.
If you were unable to print the image without defects, you should paint over the lightened areas with a black marker. If necessary, you can additionally draw a marker along the contours of each element. The paper should also be of very high quality, white, without shine or yellow tint.
You will need several sheets to print. So, Sivtsev’s table requires three sheets of A4 format. When printing a file, you need to make sure that the image is the optimal size.
The Siemens star is made in diameter 10 cm.
In the tables of Golovin, Sivtsev and Orlova, the size of the signs is of key importance. The height of the characters of the first line is 70 mm, the height of the second line is 35 mm, the last is 7 mm. The width of the characters is equal to their height. Based on these numbers, it is easy to adjust the size of the entire table to the desired size.
Before printing, you must select landscape format. This will result in three sheets, which will then need to be glued together with tape. After printing, it is better to double-check that the table scale is correct. To do this, you can simply measure the height and width of the letters with a ruler.
After this, the finished table will only need to be hung on the wall. It is best if the bottom line is at eye level.
It is imperative to take into account that vision tests according to the tables of Sivtsev, Orlova and Golovin are carried out from a distance of five meters or more.
How can you check for the disease yourself?
The Internet offers many online resources that will determine the presence of the disease. For this purpose, special images are used, which are easy to find on specialized sites. How should the test be carried out so that the results are as reliable as possible? Here is the correct sequence of actions:
- there should be no reflections of light on the monitor screen when taking the test;
- you need to sit so that the image on the monitor is located in line with your eyes, and the image on the screen is clearly visible (this is not a test of visual acuity); cover one eye with your palm or a sheet of paper;
- Look at the picture with each eye in turn.
You should be wary if the images are not clearly visible, the lines seem uneven, curved.
Lighting a room for astigmatism tests using pictures
The lighting in the room changes depending on the time of day and weather. Special light will allow you to eliminate these fluctuations and maximize the accuracy of the tests. This can be a regular desk lamp with a directional light with a 40W bulb.
You need to direct the beam of light onto the table so that it is illuminated evenly. If a home picture test for astigmatism shows visual impairment, you should seek medical help as soon as possible. Timely diagnosis and initiation of treatment will stop the progression of the disease and vision loss.
Test conditions
There are several rules that, if followed, will allow you to get the correct result:
- The room in which testing is carried out must be well lit. The person should not feel eye strain during testing.
- It is necessary to achieve absolute relaxation, because moral and muscle tension also affects the perception of the visual image.
- Most tests are carried out using pictures. It is desirable that the print quality is good. Blurry lines and printing defects may interfere with examination.
- The picture with the test should be strictly opposite the eye level of the person being tested.
- If it is necessary to carry out testing using pictures on a computer, then it is necessary to achieve the complete disappearance of glare, that is, you need to install the monitor at the most optimal angle to perceive the image from it without strain.
- In the case when diagnostic methods require examination of only one eye (right or left), it is necessary to cover the “passive eye” with a hand or other object. It is not allowed to close the “passive eye”, as this creates tension in the organs of vision.
- The distance to the monitor or picture with tests should be optimal. It is selected individually.
- If the test uses a monitor screen rather than a picture, it is desirable that it be modern, liquid crystal. Old lamp monitors “flicker”, and therefore very quickly lead to eye fatigue. During the study, this factor will cause an error in the results.
- It is recommended to take a short break after each test. One minute is usually enough to completely rest your eyes. You can blink at this time.