The most difficult cases in ophthalmology are congenital or acquired high-order aberrations. These are distortions of the visual system (myopia or farsightedness) that are not detected by conventional methods of diagnosing visual acuity. Symptoms in such patients may include: double vision of objects, luminous halos, blurriness of objects in high light conditions or at twilight.
Often in such cases, only an individual approach in combination with known vision correction techniques gives a chance to restore vision. This is especially important for people whose professional activities involve precise measurements, small movements and manipulations, or for people whose lifestyle requires absolute visual acuity.
In these cases, most often there are requirements for the universality of visual functions, that is, vision must be equally clear in high and low light conditions, when working at a monitor, driving a car at high speeds or at night, when looking closely and observing distant objects.
The personalized LASIK method of vision correction is designed to take into account not only objective data from diagnostic studies of the operation of the optical system, but also the requirements associated with lifestyle and work activity. The ultimate goal of correction is the patient’s ideal visual life in relation to the conditions and method of his individual life activity.
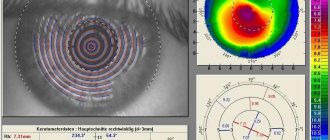
Super-LASIK requires, first of all, specific preparation. The unique diagnostic complex Pentacam (Oculyzer Pentacam) allows you to calculate the parameters of laser exposure taking into account all factors, wishes and the specific clinical situation. Based on the research results, the most suitable corneal surface is modeled, not only compensating for pathological changes, but also meeting all the patient’s requirements.
Features of the REIK method
In ophthalmic surgery, the abbreviation REIK hides an operation known as refractive-corrective excimer laser intrastromal keratectomy. This intervention, as its name suggests, is aimed at changing the refraction, that is, the refractive abilities of the cornea. Its authors were specialists from the New Look clinic in 2000. This is the only method of laser vision correction patented in Russia.
It makes no sense to consider the REIC technique as an independent operation. This is a complete analogue of the classic LASIK intervention.
, used in the world for many years. In fact, the course of the operation itself is no different and perhaps in 2000 it had at least a minimal advantage associated with the imperfection of surgical equipment at that time. Now promoting the name REIC has a purely commercial meaning.
Today, ophthalmologists have the opportunity to use femtosecond lasers and perform operations using the Femto Lasik method, which is more effective and safe compared to LASIK and REIC.
The technique for performing this procedure is relatively simple:
- The surgeon uses a microkeratome to make a thin incision and push the pedicle flap upward.
- Through the formed window, the laser evaporates the tissue thickness specified by the program.
- Upon completion of the laser operation (from 20 to 90 seconds), the flap returns to its place.
Lasik cost
Today, the price of laser vision correction
in Moscow
is between 35-45 thousand rubles. for surgery on one eye. The exact cost of LASIK is determined after a complete examination of the patient. The advantage of the operation is that it does not need to be done on both eyes at once.
Such accessibility makes laser vision correction LASIK a popular way to improve vision, and its effectiveness and efficiency make it possible to no longer spend unnecessary time and money on searching for a suitable frame, the style of which is constantly changing along with changing fashion trends and this, coupled with fragility and rapid wear glasses frames
Features and benefits of REIK:
- Changing the thickness and refractive abilities of the cornea, taking into account the original shape of the eye shell, due to which normal refraction is restored, and visual acuity can reach 100%.
- To influence the cornea, an excimer laser is used, which evaporates the cells of the cornea of the eyes layer by layer without heating it or leading to a change in structure. The risk of scar tissue formation is minimal.
- The depth of laser penetration during the procedure is adjusted individually and with an accuracy of 10 microns using the wave front, which avoids excessive tissue trauma.
- A special technique for forming and laying the flap of the eye shell reduces the risks of its displacement and other complications after the intervention to a minimum.
Correction uses a standard excimer laser with a wavelength of up to 193 nm, controlled by software with additional blocks for more precise adjustment of the wavefront.
Scleral retinal buckling
Scleral filling is aimed at restoring the adhesion of the detached area of the retina to the pigment epithelium that feeds it. This treatment, like alternative methods, allows you to preserve the viability and functionality of the retina if the patient seeks help in a timely manner. Delay and refusal of professional medical care for retinal detachment risks complete blindness.
Diagnostics prior to filling include assessment of the size, shape, location of the detachment area, as well as the approximate duration of the pathological process. This makes it possible to produce a strictly individual filling for application to the sclera. Modern fillings are made from biocompatible elastic silicone with a spongy structure.
Through an incision in the conjunctiva, the filling is placed in the desired location and secured with sutures. As an auxiliary technique, it is often necessary to introduce an expanding gas into the eye cavity. During treatment, fluid accumulation may occur, which is removed by drainage before suturing the conjunctiva.
The surgical plan for scleral retinal buckling is based on the results of preliminary diagnostics. Filling can be radial, sectoral and circular. The prognosis depends on the area of detachment, localization and preservation of nutrition of the adjacent areas of the retina. If general dystrophy occurs, there is a high risk of relapse (repeated detachment).
Features of the LASIK technique
The LASIK (Laser-in-situ-keratomileusis) vision correction method was created much earlier than the previously described technique. This type of intervention is actually performed according to an already familiar algorithm:
- The laser makes an incision on the surface of the corneal layer of the eye.
- The flap, in the shape of a round valve on a thin stalk, is moved to the side (and not up, as in the previous case) using a microkeratome - a miniature device reminiscent of a shaving machine.
- An excimer laser vaporizes part of the corneal tissue to form a lens-shaped bulge.
- The wedge returns to its place.
The intervention is performed using a standard excimer laser with a wavelength of 190 microns or more. The length, area of laser exposure and other parameters are set by a computer program. It contains values that do not allow tissues to heat up by more than 1-2 degrees, and the maximum depth of beam penetration does not exceed 1/5 of the thickness of the cornea.
Since more precise digital settings and additional drugs that accelerate regeneration are not used during the LASIK procedure, recovery takes up to 2 weeks. Until this time, vision remains insufficiently clear. There may be a slight blur in the field of vision.
Laser telemetry for vision correction: complete surgery with commentary (not for the faint of heart)
Now I will show something that doctors usually never show patients. More precisely, all this is shown in the form of a beautiful rendering, from which it in no way follows that there will be a piece of iron sticking out right in your cornea for a couple of minutes. Fortunately, you won’t feel it because of the painkiller premedication, you won’t recognize it or remember it, because the gland will be out of focus.
Inserting a spatula to cut the remaining tissue bridges into the corneal incision after laser treatment, but before removing the lenticule
Go. So, watch the video, and I will show still frames with comments. This is a real operation on a patient in a German clinic, the recording was made on a device like the “black box” of the VisuMAX device. In this case, the patient consented to the use of the recording for educational purposes; usually access to such recordings is strictly limited.
First, let’s briefly repeat the previous post about why it is necessary to cut out such a lens inside the eye and then take it out:
In short, operations of previous generations formed such an unpleasant “lid”, which during healing was held on by one flap. The flap “lid” is removed, the lens is evaporated, and the “lid” is put back.
The invasiveness is high, the “lid” never completely takes root (during injuries and physical stress, it sometimes comes off with extremely unpleasant consequences), a lot of heat is used for incisions, passing into the tissues of the eye, the Bowman’s membrane is severely damaged both by the cut and by thermal fronts.
The next generation's idea is to cut the lens right inside the cornea, and then remove it through a thin incision without this “cover.” The effect is possible because lasers allow focusing within the tissue rather than on its surface. That is, you can make a cut according to this scheme:
Now we look at the rendering of the operation:
First, the lower surface of the lens inside the cornea, then the upper, then a small incision on the side - and remove the lens with tweezers.
This is what any clinic will show you so you don't get scared. The real operation looks like this (now telemetry):
First, the patient is asked to look at a flashing green light. The lamp does not just light up, but blinks so that the person catches it in focus often enough. The eye makes an incredible number of micro-movements-saccades per second, but it is precisely this pace that allows the surgeon to make the correct capture of the eye a little later.
Here you can see the swab out of focus (in the video it moves on the left side of the eye) - this is the surgeon wiping the surface again to insure against microclumps of fat floating on it. The second purpose of this touch is to check how the premedication went. The patient must answer whether he felt something. He shouldn’t feel anything, the nerves have already been turned off by tetracaine.
Here the capture is approaching the eye, this is clearly noticeable by the appearance of the iris closer to the sharpness zone:
The pneumatic gripper is centered and fixed. The very moment of capture can be seen by a slight rotation of the eye, and this effect is very important to control when correcting astigmatism, because a rotation of 30 degrees negates the entire operation in the case of astigmatism. Therefore, the surgeon corrects the alignment.
After successful capture, we switch the observation range from visible to infrared in order to control the process and not blind the patient:
A slowly expanding ring from the edges of the eye to the center is millions of femtolaser micropulses that form a cut along the upper surface of the lenticule lens inside the cornea. The surface of the cornea is not cut through. Let me remind you that the main effect is the evaporation of several cells inside the corneal layer, and then the release of a relatively large amount of gas, which gently pushes the tissue apart.
The bottom surface of the lens is finished:
The second circle, which expands from the center of the eye to the edges, is the upper surface of the lens, which is also cut inside the corneal layer, without directly “piercing” the surface:
At approximately 01:02, a cut is formed through the surface of the cornea to the cut out lenticule lens, but it is extremely difficult to see in the video. The lens will be removed through this incision.
Now switching views (and the end of the video from the laser) - the patient is placed under the CNC control under the surgeon’s hands (in fact, he moves under the device from under the laser closer to the doctor’s hands). The first step is to wet your eye:
Switching the microscope lens, fixing the eye so that it does not twitch, using tweezers. This is a tuck, but the patient does not feel it (due to pain relief) and does not even really see the tweezers (more precisely, he sees the surgeon’s hand above his head):
The incision for extracting the lenticule is carefully separated with a tool - a spatula:
This is a very interesting place; the first small spatula is used to separate first the upper edge of the lens and surrounding tissues, and then the lower edge of the lens (in the frame below):
The spatula moves in subtle jerks - this is the resistance of micro-adhesions that arise due to the discrete structure of the cut; in some places individual fibers are not “unstuck” and need to be moved apart. You can’t just pull the lenticule by the edge, it can get caught, so a full pass is always made with a spatula over the surface so that air enters the cavity between the upper edge of the lens and the cornea and the lower edge of the lens and the cornea. The worst part looks like this:
The surgeon's hand rests with the elbow on a special support, and the wrist rests on the patient's forehead. The spatula is designed in such a way that even if the surgeon is pushed (slightly) or the patient is distracted by a loud bang, the eye will not be damaged. However, all such factors must be strictly excluded.
So, the lens is divided and ready to be removed from inside the cornea. The surgeon takes tweezers and hooks the lenticule:
All. You can finish here, but you still need to rinse your eyes. Here you can see how the fluid supply works:
The next stage is the supply of saline solution directly into the formed cavity inside the cornea:
As can be seen further, it will later flow out through the same incision through which the lenticule was removed. Previously, a second incision was made opposite the first (at the other pole of the eye) to remove this fluid, but it turned out that this was not necessary. Moreover, the smaller the incision, the better.
Smoothing to avoid micro wrinkles:
Then - removing the fixing films and finishing. You can blink a couple of times. The patient rests for a few seconds and then slowly gets up and walks into the hallway. In every clinic, there is a clock at the end of the corridor for monitoring. Next is a dialogue to reassure a worried patient:
- What time is it over there? — Six minutes past eleven. “Would you have been able to distinguish a clock from such a distance before?” - Oh. Exactly. - Well, everything is fine.
The patient calms down and goes to rest. After 2-3 hours the eye no longer feels anything. You can’t read, write, or use a phone or tablet/laptop for a day or two to promote rapid healing (after all, reading is “jogging” for the eyes); then you can’t go to a hard sauna or pool for two weeks (until the incision to remove the lenticule has completely healed, so There was no infection.) And that’s it.
I hope you haven't run away in horror yet when you see the spatula. Despite the frightening, I note that this is one of the simplest operations. Collecting the eye piece by piece after an accident with removing glass shards and other side delights for several hours, or precise manual work with a microscalpel is much more difficult and stressful.
To questions about how exactly a pneumatic gripper works, how it is possible to accurately cut a lens of the desired shape and diameter, what happens to the corneal tissue at the cut boundary, and why it is generally so difficult to cut a lens inside the eye (and why it is the safest). Plus how the operating room is prepared, how the surgeon calms the patient, how premedication is performed, what kind of protection there is from unforeseen situations (power outages, a passing truck) and so on, I will answer in the next big post. And about the promised comparison of lenses and operations later too. All of these are separate topics for discussion, and alas, it’s not possible to write much about them a little later. In the first post in the discussion, many topics are superficially touched upon.
Which is better: REIC or LASIK?
Most ophthalmologists who have used both methods of vision restoration, as well as more modern methods, believe that they are absolutely equal in effectiveness. This is due to the fact that, in essence, REIC and LASIK are based on the same technologies, and the differences are nothing more than a “commercial” approach to technical manipulations:
- for LASIK and REIC, standard diagnostic equipment is used, in contrast to Super LASIK when specialized wavefront equipment is used;
- the direction of the flap for the first procedure is strictly upward, and for the second - to the side;
Both procedures have many similarities: the excimer lasers used, the microkeratome, the list of indications with contraindications, the wavelength of the laser, and the depth of its penetration. The duration of the operations is also similar - in both cases they do not exceed 90 seconds.
Summarizing the above, we can conclude that by choosing REIC you are choosing the classic LASIK technique
, used all over the world for more than 30 years. Both of these techniques are not state-of-the-art and both have limitations, for example in patients with insufficient corneal thickness. In this case, it is recommended to consider femtolaser vision correction using the Femto LASIK or Femto Super LASIK method. Both of these techniques have significant advantages.
What is laser vision correction?
Laser vision correction is performed for severe refractive errors , when the patient can see normally only using glasses or contact lenses.
Some people prefer not to resort to this method, especially if the violations are minor and do not progress.
But often myopia or farsightedness worsens with age, and astigmatism may not allow full use of corrective optics.
This type of surgery is indicated in the following cases:
- myopia ranging from -1 to -13 diopters;
- farsightedness from +1 to +6 diopters;
- astigmatism with readings from -4 to +4 diopters.
For your information! There are several types of laser correction, and the choice depends partly on the degree of the disorder (some techniques do not help with large deviations in diopters).