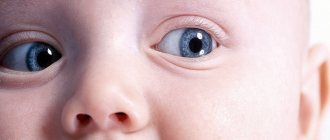
How do children see?
Vision formation occurs even before the child is born.
Therefore, the first trimester of a mother’s pregnancy is very important. Most congenital defects and pathologies of the visual organs are at high risk during this period, since an “error” can creep into the process of organ formation.
A newborn baby sees the world as a mosaic, hardly distinguishing between the sizes and shapes of surrounding objects.
And only four weeks after birth, the baby’s gaze begins to focus on surrounding objects.
And after another couple of months, the baby can independently monitor the movement of objects without stress.
The focusing of the visual process in children is normalized only at 10–12 months.
Only by the age of 7 will a child be able to clearly see one object with both eyes at the same time.
The development of visual organs does not stop until the age of 15.
The closer the child's head is to the object being examined, the higher the risk of developing myopia.
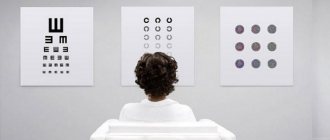
Recognition signs for determining visual acuity
Letters and numbers
Letters of the Latin and Russian alphabet, the probability of recognition of which is the same, that is, these symbols can be confused with each other. For example, in Russian ophthalmology it is customary to use the letters N, K, I, B, M, Sh, Y. Numbers from 1 to 9 can also be used to test vision.
Outlines of recognizable objects
Such simple pictures are used to test vision in children, since they are easy to name and describe, even without knowing the alphabet and numbers.
Now let's take a closer look at the most popular vision testing tables. For greater understanding, let us clarify that during the study the person is located at a distance of 5 meters from the table; this is considered sufficient to relax accommodation. Accommodation
- the ability of the eye to clearly see objects at different distances. It is realized due to the lens and ciliary muscle.. And the smallest line that a patient with normal vision sees clearly is considered basic. Next to it you can see the values of a decimal or common fraction: 1.0, 20/20 or 0.0.
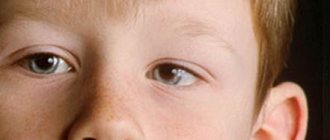
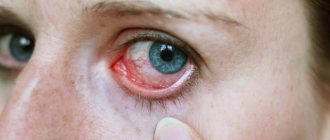
Symptoms of visual impairment
The child’s visual system remains dynamic for a long period of time and needs timely correction and diagnosis.
Parents must understand that the child cannot always notice the disturbances in his vision himself, or is not able to tell and explain. Therefore, you should pay attention to external signs of visual impairment:
- squinting of one eye;
- tearing eyes;
- increased sensitivity to bright light;
- lack of concentration;
- difficulty reading;
- attempts to bring the object closer to the eyes.
Timely detection of visual impairment reduces the risk of developing pathologies and eye diseases in the baby.
The most common diseases:
- Amblyopia – weakened vision.
- Strabismus is the inability of the eyes to look at the same object at the same time. The disease occurs due to disruption of the eye muscles.
- Color blindness is an incorrect definition of the color spectrum.
- Myopia – deterioration in the visibility of distant objects.
- Farsightedness is reduced visual perception of objects near.
- “Night blindness” is deterioration of vision at dusk and dawn.
Why check your eyesight and how to use the table
The Golovin-Sivtsev table is used for both adults and children.
Due to the continuously increasing computerization of all spheres of human activity, the load on the eyes is increasing.
People, especially office workers, sit for 8-10 hours a day, literally without straightening their backs and without taking their eyes off the screens of computer monitors, laptops, and tablets.
Every second person complains about poor vision and at the same time about the lack of time to visit an ophthalmologist.
Currently, the Golovin-Sivtsev table can be purchased in printed form or downloaded from the Internet and also printed, or worked with the image on a computer monitor screen. Thus, it only takes a few minutes to check how the visual organs perform their functions without leaving home.
As mentioned above, the study is carried out at a distance of 5 m. The subject sits 5 m from a diagnostic table vertically located at his eye level and alternately looks at it, trying to distinguish the symbols, while simultaneously covering the other eye with his hand or a special spatula.
During the examination, you should not squint your eyes, lean forward or lean back. The so-called full visual acuity will be equal to the value indicated on the right side of the table opposite the line whose letters are clearly distinguished by the subject. If the letters or Landolt rings in the next line are partially different, this will be incomplete visual acuity.
If a person sees letters or symbols well only in the top row, his visual acuity is taken as 0.1. With normal vision, the signs of the tenth line from the top are clearly visible. This vision is taken as 1.0.
If a person has vision below 0.1, that is, he does not see the top row of letters of the table from a distance of 5 m, a scheme with Polyak’s optotypes is used for further research. As the latter, figures in the form of rings with a cut out part (break) and three parallel segments are used.
First vision test
The first vision test is carried out before the mother and baby are discharged from the hospital.
Premature babies and babies weighing less than two kilograms are carefully examined. The check is carried out by external visual inspection:
- The eye shape should be narrow and identical, and the pupil's reaction to light should also be present.
- Using an ophthalmoscope, the fundus of the eye is examined to determine the presence or absence of congenital cataracts.
As soon as the baby learns to talk, it is worth carrying out preventive checks for the weakening of the visual apparatus at home. Tables developed for preschoolers by the best ophthalmologists will help parents with this.
Eye test charts
Tables for home vision testing are classified according to the child’s age. There are tables for preschool age - from three to seven years, and for schoolchildren
Orlova table
The main purpose of the table and its feature is to test the visual acuity of preschoolers who cannot read.
The table contains silhouettes of toys familiar to children. With each line the size decreases.
The left side of the table next to each line contains the distance in meters.
From this distance “D” a child with developed vision should see the image.
The right side of the table is designated by the letter “V” and indicates the value of visual acuity in arbitrary units. Acuity is measured from a distance of 5 meters, at which the tenth line image recognition is considered the norm.
The top line is 0.1 USD, 2.0 is the bottom line. Image recognition of line 10 from five meters is 1.0, which is considered to be the norm.
Instructions for checking visual acuity using the Orlova table
Before the vision determination procedure, you should take the child to the Orlova table and ask him to say the name of each picture.
Vision test conditions:
- Print the table on a sheet of A4 paper.
- Place the table on the wall so that the tenth row corresponds to the baby's eye level.
- The space between the child and the table should be 2.5 meters.
- The room should have even, good lighting.
- The child should be positioned straight and not slouch.
- Cover the child's left eye with your hand or a light-blocking spatula. Make sure that the child does not squint his eyes under any circumstances.
- Ask your child to name the images in lines one by one, gradually going down the row.
- Record the value of “V” at which the child began to have difficulty and was unable to continue naming the pictures correctly.
- Do the same test with the child's right eye.
- The numbers around “V” will be the value of visual acuity.
For a more accurate vision study, errors are allowed using this table. You cannot make mistakes in the first, second and third. From the fourth to the sixth, one mistake is allowed. From seventh to tenth there are a maximum of two errors. The last two rows of the table are used to identify children with 150 and 200% vision, or when the room is not long enough.
Sivtsev table
This type of table is designed for school age and subsequent years.
The right side is also marked with range “D”, the left side with “V”. The principle of operation of the table is identical to the previous one.
Vision test process:
- The table should be located five meters from the child’s eyes.
- The tenth line should be just at eye level.
- Direct the light directly onto the table, avoiding it on the child's face.
- The light should be bright, uniform and 700 lumens per square meter.
- Check both eyes one at a time, starting with the right one.
- No more than three seconds are given to identify the letter.
- The "V" designation represents the child's visual acuity level.
When checking vision according to the Sivtsev table, errors are allowed in the following rows: from the third to the sixth, no more than one, from the seventh and subsequent rows, no more than two.
If a child sees the eleventh and twelfth lines, then he has visual acuity above normal. Such children are unique in their kind.
Snellen chart
This type of vision test table is very common in the United States. The table is an analogue of the Russian author Sivtsev. Eleven lines of letter content.
The letters are reduced in size from top to bottom so that a person can distinguish them from a distance of 20 feet or six meters.
How to perform visometry yourself?
Visometry is the process of measuring visual acuity. The Snellen chart is one of the self-diagnosis options.
To carry out this procedure, you must perform the following steps:
- Print the table on A4 format. The leaf must be pure white, without a yellowish tint.
- Letters should be clear and deep black.
- The finished table must be placed on a flat vertical surface. This could be a wall, a cabinet or a door.
- The lighting in the room should be uniform and bright. Lamps of at least 40 watts.
- Place your child on a chair six meters from the table.
- The right eye remains free, the left one must be covered with the palm of your hand.
- Next, the child pronounces the letters one by one, and the parent records the number of the last visible line.
- The procedure is repeated with the left eye.
- To the right of the letters there are indicators of visual acuity. The line number corresponds to the vision quality indicator.
Golovin table
The Golovin table is used by ophthalmologists in tandem with the Sivtsev table. The signs on such a table are special rings, torn from the sides or top and bottom. 12 rows of symbols gradually decrease.
Vision test using the Golovin table
The principle of such a check is identical to Sivtsev’s table:
- You need to print the table on a sheet of A4 paper.
- Place the table on the wall so that the tenth line corresponds to eye level.
- The distance between the child and the table should be 2.5 meters.
- The room should have uniform, good lighting.
- The child should stand straight, straight and not slouch.
- Cover the child's left eye with your palm or an opaque spatula. Make sure that the child does not squint his eyes under any circumstances.
- Ask the child to name one by one in which direction the gap in the rings is directed, gradually decreasing by row.
- Record the “V” value where the child stopped and was unable to continue correctly recognizing pictures.
- Repeat the same procedure with the child's right eye.
- The “V” value will be the level of visual acuity.
Pole's optotypes for vision testing
Optotypes are tables for testing vision.
Polyak's table differs from the above tables of his colleagues in its narrow focus in verification. Pole developed these optotypes to test the vision of people with an index below 0.1.
The table is a combination of ring and three-line symbols.
Dimensions of Golovin and Sivtsev tables
The dimensions of the optotypes (letters and rings) of the Sivtsev and Golovin tables are: 70 mm – the height of the first line, 35 mm – the second, 10 mm – the last. The dimensions are determined by the formula: 7 mm divided by “V” (the line that needs to be calculated).
If you do not have the opportunity to print a full-size Golovin table to test visual acuity, you can do this on a standard sheet of A4 paper, but in this case, reduce the distance (D) indicated in the left column by 2 times, i.e., instead of 5 m – 2.5, instead of 2.5 – 1.25.
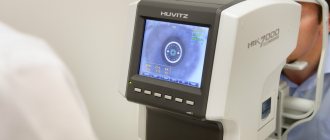
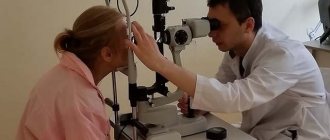
Eye testing devices
Not all vision parameters can be determined using tables. For a more detailed study of the human visual system, instruments have been created that can measure parameters down to the smallest particles.
The equipment is constantly updated, and technical progress in the ophthalmological field of medicine is growing. This will allow in the future to speed up not only the detection of diseases, but also improve the percentage of cured patients.
Modern diagnostic devices are capable of examining a child using games. This method will distract the child and reduce his fear of doctors.
The most used diagnostic devices:
- An autorefractometer is a device that determines the presence of astigmatism, myopia or farsightedness in a person.
- Non-contact tonometer - will determine the level of intraocular pressure. With the help of a directed air flow, direct contact of the device with the eyeball is not required.
- “IOL Master” is a high-tech device that will select the appropriate lens of the eye in sixty seconds. Such a device is necessary for the treatment of cataracts, as well as severe degrees of myopia and farsightedness.
It is much easier to cure a disease of the visual apparatus with an early diagnosis. Do not neglect examinations by an ophthalmologist, then your visual acuity will never fail.